CRISTAL is an undulator-based diffraction beamline, dedicated to single crystals and powders between 4 and 30 keV.
X-ray diffraction is one of the most powerful method for structure determination.
CRISTAL is a high-performance undulator-based beamline providing state-of-the-art techniques such as coherent diffraction, time-resolved diffraction, high angular and high spatial resolution diffraction.
The three instruments are:
- A 2-circle power diffractometer equipped which multi-analysers
- A 4-circle diffractometer for precise high-q measurements
- A 6-circle diffractometer, offering an exceptional experimental potential.
Time-resolved pump-probe experiments are operational at the picosecond resolution, and soon (2014) at the femtosecond resolution
A braod scientific community initiated this beamline in complementarity with ESRF.
Team
Technical data
4 – 30 keV
ΔE/E ~10-4
Onduleur sous vide U20
Monochromateur à deux cristaux
Min (largeur à mi-hauteur)
Vertical : 30 μm
Horizontal : 450 μm
Max (largeur à mi-hauteur)
Vertical : 400 μm
Horizontal : 1000 μm
- 2-Circle diffractometer
- 4-Circle diffractometer
- 6-Circle diffractometer
Detecteurs ponctuels
Detecteurs 2D
- Pression
- Temperature
- Divers
Scientific opportunities
|
Powder diffraction |
High angular resolution for ab initio structure determination |
|---|---|
| Single crystal diffraction |
Single crystal structure determination Incommensurate crystals, quasi-crystals |
| Electron density measurements |
Low temperature (30K) and high q diffraction measurements for charge density analysis. |
| Coherent diffraction |
X-Ray Coherent Diffraction |
| Pump-probe time-resolved diffraction |
ps time resolution diffraction |
Undulators
The source of the beamline is an U20 undulator, containing 100 periods of 20 mm.
This undulator was chosen in order to obtain the highest possible energies, without losing high brilliance (this excluded the use of a Wiggler).
In a low-energy ring like SOLEIL, the U20 highest brilliance is obtained at very low energies (1.5 keV), as shown in Figure 2a).
These energies are unfortunately not usable in diffraction. We have chosen to limit the range in energy from 4 keV to 30 keV. The theoretical spectral brilliance of the U20 of CRISTAL (in ph/(s.mm2.mrad2.0.1%bw) = Bunits) is given in Fig. 1a). Fig 1b) gives the measured flux (ph/s) after a Si(111) double reflection, 33 m downstream of the source.
This measurement was performed using a calibrated X-ray camera. Comparison with calibrated diodes data confirmed the measured values within a factor two.
The data were corrected by the absorption of the Be windows still inserted on the beamline and the residual air between the camera and the exit window.
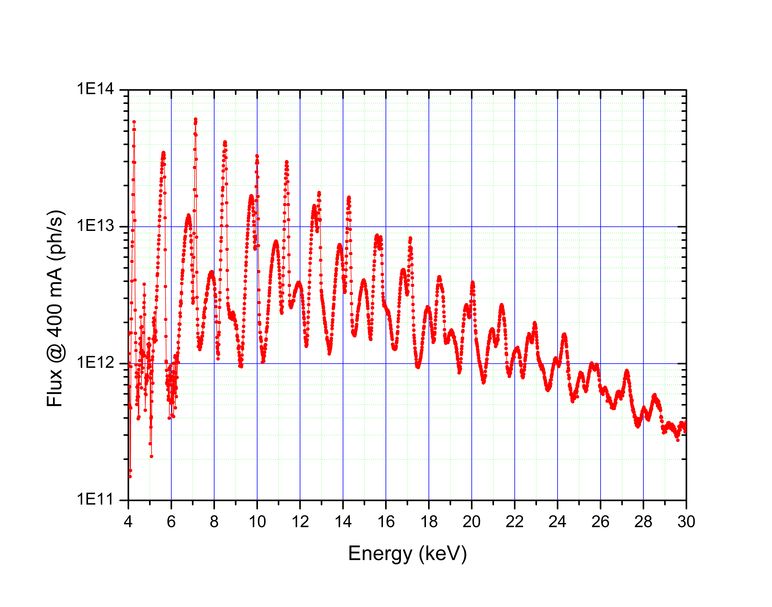
Measured spectrum of the CRISTAL U20, with absorption corrections. Harmonics from H3 (4.29 keV) to H20 (28.6 keV) are shown.
The measured and calculated flux (Th. Moreno, optics group) for a few energies are indicated in Table 1. Within a factor 2, the calculated values are in good agreement with the experimental ones, especially in the middle energy range. Note that our measurements are less precise at low energies, due to the difficulty to get correct absorption corrections. A good mnemonic device, is that the flux decreases by an order of magnitude every 10 keV; this has been checked up to 50 keV.
From these measurements and the measured size of the beam (an example of the unfocused beam profile is given on Figure 3a), the spectral brilliance of the undulator can be obtained. At 8 keV for example, the measured flux is 3 1013 ph/s after a Si(111) of theoretical band width bw=1.4 10-4.
The measured beam size is 2.0 mm × 1.2 mm (H ×V) FWHM at 40 m, which gives a divergence of 0.02 mrad × 0.013 mrad r.m.s. The theoretical size of the source is 8 µm × 355 µm (r.m.s.).
The horizontal value was checked using a Fresnel zone plate, but the vertical value was too small to be measured by our detector.
Similar calculations give the values indicated in Table 1. Again, except at low energies, the measured and calculated values are in good agreement.
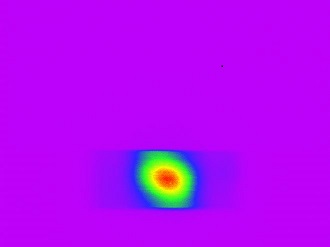
Image of the 17 keV beam (gap=5.96 mm), recorded on the Basler camera (22 µm pixel size) located 42 m from the source.
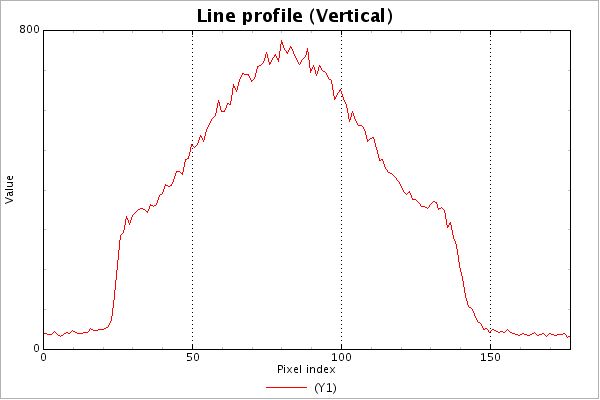
Vertical profile of the beam: FWHM = 1.7 mm
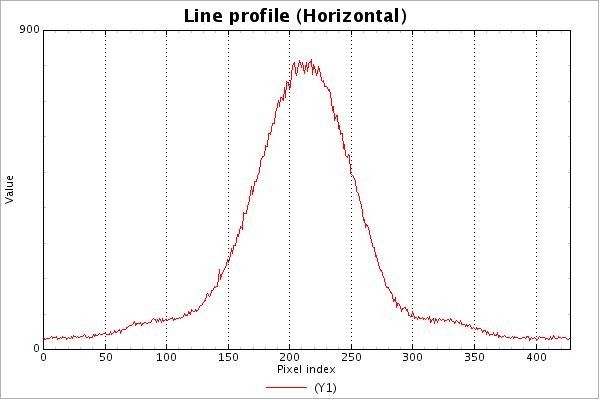
Horizontal profile: FWHM = 1.4 mm.
Monochromator
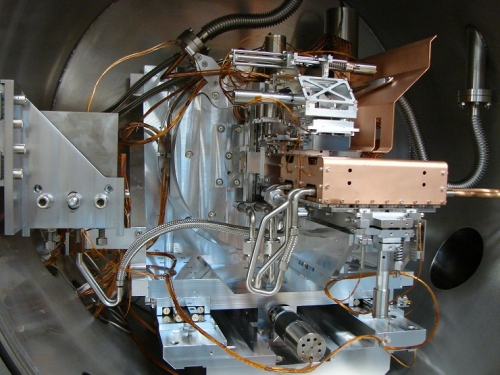
CRISTAL monochromator
The monochromator is a fixed exit DCM from the Accel company, equipped with two pairs of crystals: a pair of Si(111), with a sagittal bender on the second crystal, for energies between 4 and 30 keV, and a pair of flat Si(311) for energies between 8 to 60 keV.
The first crystals are cooled down by a liquid nitrogen closed loop circuit (Cryotherm company). The tuning of the monochromator is ensured by a piezo-actuator, controlled by a feed-back loop on the intensity measured downstream. The feed-back loop is performed by a “Mostab”, developed at Desy, which was provided by Accel.
 The curves shown below display the Cu K-edge absorption spectra (8.979 keV), with Si(111) and Si(311) DCMs before energy calibration. The visibility of the first peak indicates the good resolution of both DCMs. In the right part of the figure, the derivatives of repeated spectra measured on June 6th and June 10th, 2007 show a 0.5 eV reproducibility in energy (5 10-5). However, additional measurements have shown that after a long beam loss or a large angular displacements of the DCM, the reproducibility could deteriorate down to ΔE/E = 10-3, requiring an energy re-calibration if accuracy is needed.
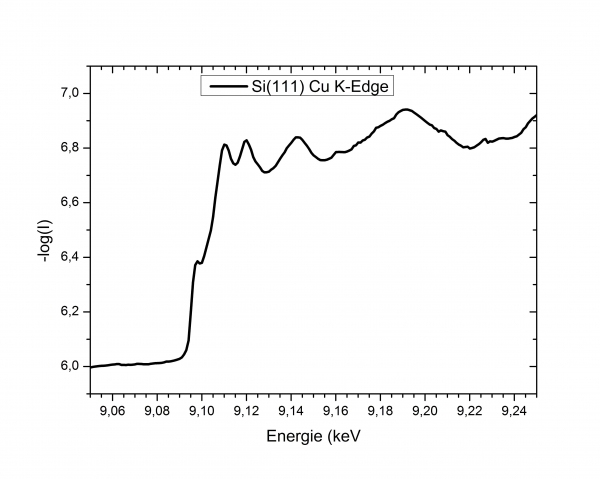
Cu K-edge measured with the Si(111) (left) and the Si(311) (middle) DCM. On the right-hand side, comparision of the derivatives of the near-edge region measured at t0 and t0+4 days.
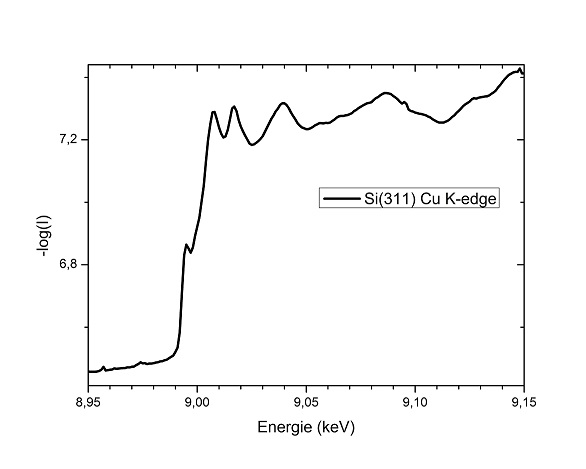
Cu K-edge measured with the Si(311)

comparision of the derivatives of the near-edge region measured at t0 and t0+4 days.
Mirrors

CRISTAL mirror system
The mirror system consists of two horizontal 300 mm long Si mirrors (SESO), placed in a dedicated hutch. The first one is bendable. These mirrors are coated by Rh and Pt tracks. This allows an harmonic rejection in the whole energy range. Slope errors are 0.35 µrad for both mirrors. The minimum beam FWHM has been measured to be 27 µm @ 8 keV on the 6-circle.
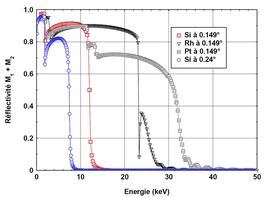
Calculated reflectivity of the CRISTAL mirrors
2-Circle diffractometer
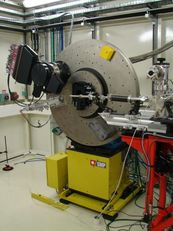
2-Circle diffractometer and its multi-crystal analyser in the BC hutch
Description and characteristics
Most of the powder diffraction experiments are performed on the 2-circle diffractometer. This instrument is positioned at the end of the beamline, 40 meters downstream of the U20 undulator to obtain a natural beam size (without any focusing) well adapted for Lindemann capillaries usually used for high resolution diffraction (with diameters from 0.7 to 0.9 mm). To study samples under various environments (cryostats, gas streamers) or to use alternative detectors, a XYZ table can be installed in front of the goniometer. This dedicated instrument is optimized to record high angular resolution diagrams for ab initio structure determination or to study phase transitions.
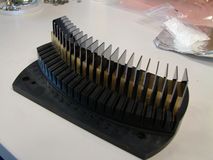
The 21 Si crystal analysers on their holder
To reach the best resolution, detection is performed by 21-Si(111) crystal analyzer designed and built by Laboratoire de Physique des Solides (Orsay) and SOLEIL, with the help of J.-L. Hodeau and A. Prat from Laboratoire de Cristallographie (Grenoble). This system is similar to the 9-crystal analyzers of BM16/ID31 beamline at ESRF (Hodeau et al., SPIE, 1998). To adjust the multi-analyzer at the chosen energy, only 2 rotations are used: one common rotation (theta) for the 21 crystals and another one (two theta) for the 21 detectors. To obtain a stable and reproducible mount with constant relative orientation (around 1.3°) between adjacent analyzer crystals, the crystals were glued with paraffin (to limit crystals deformation) on precisely machined supports.
The 21 Si(111) crystals are followed by fast YAP(Ce) scintillation detectors (Scionix) mounted on the analyzer. The signal of these detectors is shaped and amplified using homemade amplifiers-discriminators (detector group), which deliver TTL pulses. These pulses are simultaneously detected with the encoder pulses of the 2-theta diffractometer circle. After data collection 21 independent diagrams are obtained, which are shifted and summed to give the final diffraction diagram. This setup allows the recording of high resolution diagrams in about one hour in continuous scan mode.
To take advantage of the high angular resolution given by the analyzers, the diffractometer needs to be stable and accurate, qualities which had to be checked during the conception and building of the instrument. Mechanical and optical measurements were performed at the delivery of the 2-circle diffractometer built by SMP (Lyon based company). The table below gives the main characteristics of the powder diffractometer.
| Diffractometer angles | 2-theta | Omega |
| Usable range (°) | -20 to 130 | |
| Accuracy (°) (range 360°) | < 0.0006 | < 0.0006 |
| Reproducibility (°) | < ±0.0003 | < ±0.0002 |
| Resolutio (°) (mechanical) | < 0.0005 | < 0.0005 |
| Encoder resolution (°) | 0.0000555 | 0.00005 |
| Settling time (s) | < 0.5 | < 0.5 |
| Max speed (°/s) | 2 | 2 |
| Max Load (kg) | 150 | 72 |
Measurements of reference powders
Since mechanical or optical checks cannot be performed routinely, we mainly rely on powder diffraction measurements by standard materials to check the accuracy of the diffractometer: at the beginning of each experiment, a comparison of the positions of LaB6 (NIST-SRM660, cubic Pm3m) Bragg peaks with calculated ones allows one to verify both the measured accuracy and the signal over noise ratio.
The ratio of the height of the strongest reflection to the background under this reflection appears to be a simple criterion to evaluate the sensitivity of the instrument. When this ratio approaches 1000, measurements of weak reflections down to intensity below one thousandth of the strongest reflection can be easily detected in a powder diagram. The precision of the measurement can be assessed from the indexing figure of merit F20 (Smith and Snyder, 1979) . For LaB6 diagrams recorded on the CRISTAL powder diffractometer, a F20 value above 5000 is routinely obtained which indicates an average error below 0.0002°. This small value gives us a good confidence on the precision of the measured angles.
Besides the mechanical angular resolution, another important characteristic of the powder diffractometer is its “instrumental resolution” which mostly depends on the beamline optics. This resolution function can be calculated from the beamline characteristics but in most cases one refers to the Bragg peaks widths of a well crystallized standard such as LaB6 or NaCAlF. This function is provided to the user who can use it to determine the sample “true” peak shapes. The resolution obtained with the analyzer setup is comparable with other third generation synchrotron powders beamlines with minimal peak width ≤ 0.005° in 2Θ.
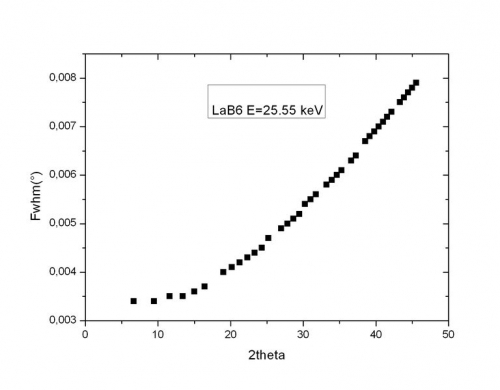
Instrument Résolution Function (IRF) at 25.55 keV as a function of the 2theta diffraction angle.
4-Circle diffractometer
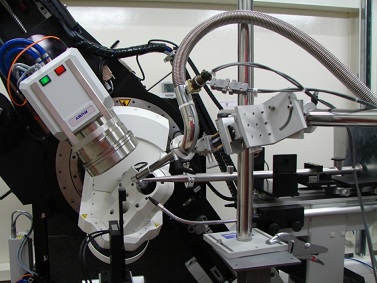
View of the 4-circle diffractometer equipped with a gas streamer (CryoIndustries of America) to cool the sample. Insert: axes names.
The purpose of the project was to provide the users (crystallographers, chemists, physicists, mineralogists) with a 4-circle diffractometer allowing an easy, fast and precise data collection on single crystals in different sample environments. The instrument specially built for the beamline has resulted from the association of two companies each well known in their area: Newport (Microcontrol) for the goniometer part and Agilent (Oxford Diffraction) for the detector and data analysis software.
The data are measured using the oscillation method: for each image acquisition, the diffraction signal is measured while the sample is rotated at constant speed over a small angular range (typically 1°). Therefore, the requested main characteristics of this instrument are:
- a 2D CCD detector permanently mounted, which can be translated (80 mm < dtx < 340 mm)
- high accuracy of motions,
- very small sphere of confusion to be able to study micro-crystals (Ø < 10 µm),
- data acquisition/analysis software package standard and familiar to most users.
All the motors are DC motors driven with Newport XPS controllers. Let us recall that the Cylinder of Confusion (CoC) is the largest diameter of the cylinder described by the sample during the motion of the concerned rotation axis, and the Sphere of Confusion (SoC) the largest dimension of the volume described by the sample during the motion of all the axes.
6-Circle diffractometer

Newport 6-circle diffractometer, in a vertical position.
The 6-circle diffractometer was designed to be precise and able to hold heavy sample environments (up to 15 kg) and detectors (up to 10 kg). It consists of four axes similar to the 4-circle ones (Komega, Kappa, Kphi, Delta) and two additional axes, mu for the sample and gamma for the detector, allowing the diffraction plane to be horizontal. The 6-circle is equipped with a 3-circle analyzer for high resolution measurements and polarization analysis. Like the 4-circle, all the motors are DC motors driven with Newport XPS controllers.
The measured angular accuracy of all axes are better than 0.001°. The sphere of confusion is better than 60 µm.
Detectors
The 2-circle and 4-circle diffractometers have their own detection system (respectively a 21-analyzers system and an Agilent 2D CCD detector). Below is a list of other detectors used at CRISTAL, either belonging to the beamline or to the detector pool. The possibility to use a particular detector on a given instrument is symbolized by the colored icons.
Point detectors
YAP, CeBr3 scintillators CRISTAL : point detectors used for high resolution diffraction
2D Detectors
 |
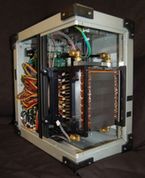
CRISTAL: ANDOR CCD Camera (iKon-M 934) Specially designed by ANDOR for our needs (see ANDOR flyer including CRISTAL slits diffraction pattern). Deep depletion back-illuminated direct illumination CCD 1024 x 1024 pixels, 13x13 µm2 pixel size. Used for • Coherent diffraction. • Ptychography. |
|
 |
Pool: XPAD 3.1, XPAD3.2: Hyprid pixel detectors developed by SOLEIL, in collaboration with the ESRF CRG BM2 and CPPM. |
|
 |
Pool: MAR345 Image plate detector. 100x100 µm2 pixel size Used for : • Low resolution powder diffraction experiments • High Pressure diffraction |
|
 |
Pool: Rayonix SX165 CCD camera, 165 mm diameter, 40 µm pixel size min. 4096x4096 pixels Pixel size: 40x40 µm2 (min). Used for: • Crystallographic measurements, • Powder diffraction |
|
 |
CRISTAL/SIXS/GALAXIES beamlines: MAXIPIX 2 Purchased in common with SIXS and GALAXIES Will be available in Novembre 2012. Will be used: • Coherent diffraction and ptychography. |
Pression
 |
Ambient temperature pressure setup The sample is a Membrane Diamond Anvil Cell (MDAC), on the Phi stage of the 6-Circle diffractometer. The detector is the MAR345. A laser, located at 90° of the X-ray beam, can be approached to the 90° rotated MDAC, in order to measure the fluorescence of ruby crystals in the DAC. This in situ pressure measurement, allows one to change the pressure without removing the MDAC. |
|
 |
Low temperature pressure setup The MDAC is located in a specially designed liquid Helium flow cryostat (Tmin=14 K and soon 5 K). Equipped with Kapton windows. The detector is a Rayonix CCD camera. The in situ pressure measurement is the same than the ambient pressure one. The picture shows a pressure measurement, with the laser on. |
Temperature
Cryostats
 |
Powder diffraction top-loading He-cryostat with rotating capillary (max 2 rps) facing the 2-circle diffractometer (conception R. Steinman, ESRF). Temperature range: 4-300 K. |
|
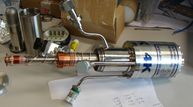 |
Closed cycle cryostat (Advanced Research System, ARS DE-302). This cooling system has been designed to fit the 6-circle diffractometer in order to allow many diffraction configurations. Beamline usage shows that the limitation mainly comes from the He-outlet. This cryostat is used for the diffraction experiments which are not sensitive to vibrations.Tmin = 6 K. |
|
 |
ARS HELITRAN liquid helium flow cryostat placed on the 6-circle diffractometer with the coherent diffraction settings. This cryostat, which has angstrom level vibrations, is well suited for such experiments. Contrarily to the previous displex system, this cryostat is not free to move in any orientation, and should work near the vertical position as shown on the picture. Tmin = 4 K |
Gas blowers
 |
Hot gas blower (Cyberstar) for powder and single crystals. Temperature range 20-900 °C |
|
 |
Gas streamer cooler (N2/He) From Cryo Industries of America. Lowest temperature with N2 : 80 K and with He: 30 K. In order to avoid ice formation on the sample, a heated goniometer head is used. |
